3D WP Tag Cloud-M User Guide
Version 3.2.6
https://wordpress.org/plugins/3d-wp-tag-cloud-m/
N.B. 3D WP Tag Cloud-M creates multiple Tag Cloud. It allows showing up to 9 types of content which are activated from static menu (links) or dynamic one (another rotating cloud). Thus visitors of your site can see its: Archives, Authors, Blogroll (List of external links), Categories, Menu, all Current Page/Post Links or only those from a specified HTML container in it (table, div, ul etc.), Pages, Post Tags and Recent posts. Due to complexity of this multiple version some settings available in single one are excluded here. Supports Shortcodes.
This Guide is intended to help ordinary users in working with 3D WP Tag Cloud-M This version of the plugin incorporates only options that an average user will need to set. Only two, related to adding a Center Function, are for advanced users. At the bottom of the Guide there are examples of what can be done with the plugin.
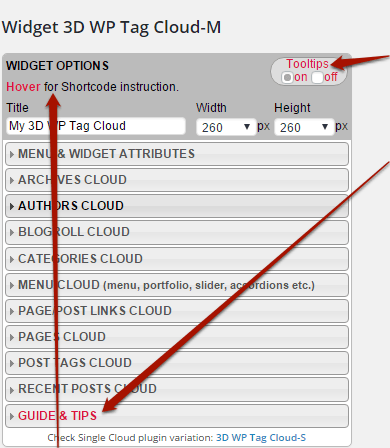
Before you start, be advised that each option has a tooltip. So read them while working and Life will be much easier for you. In case you are not keen on following somebody’s advises – turn them off.
On another hand there is a helps section at the bottom of the widget (GUIDE & TIPS) where you can find this guide and number of specific practical tips. So take a look there when you have a problem.
Apart from it plugin has 10 more sections. One for the MENU & WIDGET ATTRIBUTES and 9 for the content: Archives Cloud, Authors Cloud, Categories Cloud, Blogroll Cloud (External Links), Menu/Portfolio/Slider Cloud, Pages Cloud, Page/Post Links Cloud, Post Tags Cloud and Recent Posts Cloud.
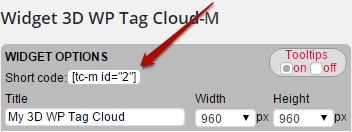
N.B. Later, after you set up your cloud and save it in Inactive Widgets, the plugin will put here a sort code for your usage in pages, posts etc.
 Open MENU & WIDGET ATTRIBUTES section.
N.B. Each option in this rectangle is subject of setting.
1. Choose Type of menu.
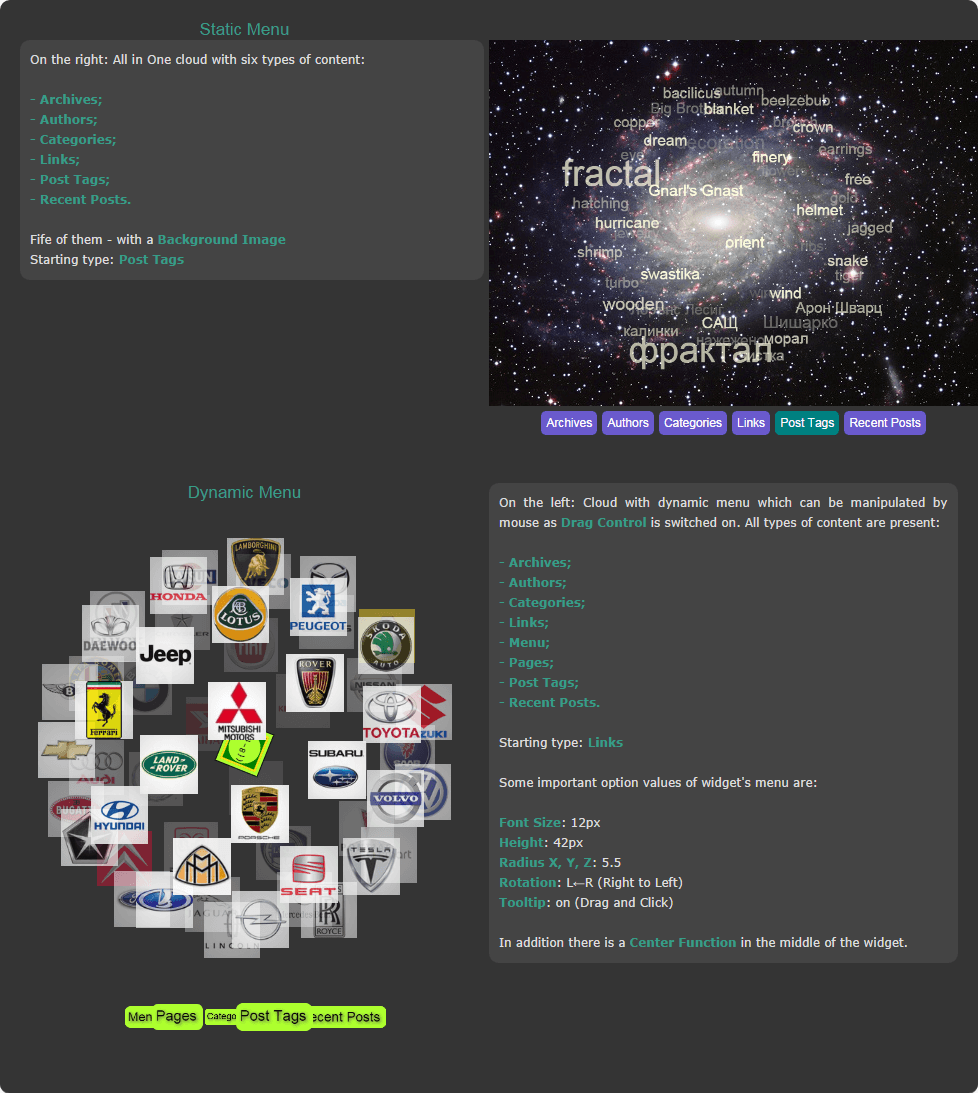
N.B. Dynamic Menu allows Drag Control. When a mouse pointer is over it a tooltip "Drag or Click" reminds about this feature. Menu items are clickable at front side only. Visually both types look this way:
Static with 4 types of content

Dynamic (Rotating Cloud)
2. Choose a Height of menu
3. Choose a direction of Rotation (for dynamic menu).
4. Turn on/off menu’s Tooltip (for dynamic menu).
5. Select types of content to Include in menu and choose which one to Start with when users open your page.
N.B. It is good to know in advance that:
- you can’t select less than two types for menu items;
- you can’t uncheck a type if it is selected as Starting, and
- selection of a Starting type automatically makes it included.
6. Choose a Web Safe Font and all of its properties: Font Size, Font Color, Border, Border Color, Shadow, Shadow Color, Background, Active Background and Outline.
N.B. Active Background is the background of an active menu item.
7. Change this label if you are going to show portfolio or slider type of content under menu option. For instructions on how to put portfolio or slider types of content in the cloud go to Cloud Content Tips, item 5, under GUIDE & TIPS section.
8. Play with Radius until you fit the menu in widget’s frame (for dynamic menu).
9. Enter a Background Image URL.
Now let's wocus on next subsection: WIDGET ATTRIBUTES.

1. Choose Function.
N.B. If you want to put an image in cloud's center choose image_cf(). If you want to put there some text choose text_cf().
2. Choose direction of Rotation if you prefer rotating image/text.
3. Change Opacity for adding transparency.
4. In case of image_cf() enter your image location (http://your-site.com/your-folder/your-image.png).
N.B. It is advisable to use png format images due to advantage of transparency. It is good if image sizes are equal to widget's Width, and Height or bigger but in same proportion. Opaque part of it should look compact and be in the center. Plugin will resize image so that tags pass along without "bumping" in it.
5.
In case your choice is text_cf() select:
- Text Container (square, landscape rectangle or portrait rectangle);
- Font and its properties (Color, Size and Weight);
- Container Background, Border width and its Color.
Then enter short Text (up to five lines) and play with Zoom if necessary.
N.B.
1. If your text is one line use #3. If two - fill up #2 & #4. If three - fill #2, #3 and #4. In case of four - #1, #2, #4 and #5.
2. For no Border set it to 0 or empty its Color field.
3. For plain text empty Background and Border Color fields.
4. Landscape rectangle for Text Container is suitable for hring &
hcylinder shape when x-axis rotation is locked.
Portrait is suitable for
vring & vcylinder shape when y-axis rotation is locked.
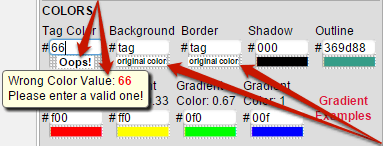
5. Be aware that the plugin verifies entered hexadecimal color values.
A color indicator will show your choice once you leave the field if entered value is correct. If it is not you will be warned.
See below an example of a missing digit value and warning you get.

The color indicator is superseded by an exclamation "Oops!" and plugin does not let you continue until wrong value is corrected. For your ease both value formats 3-digit and 6-digit are acceptable.
At this point you need to continue with setting options of content types you have selected above in Include. Assuming that Archives is one of them open ARCHIVES CLOUD section.
N.B. As you see options are divided into 5 subsections: GENERAL, SIZES, COLORS, FONTS and SPEED & TIME. You will have to go through all of them.

1. Choose a Shape of the cloud.
2. Choose a Target for opening tag links.
3. Choose a Number of archives to be shown.
N.B. As WP archives are monthly they are chopped on 6 months portions here. This option is suitable for sites and blogs with big activity.
4. Switch on Weight.
N.B. Later you may choose another Weight Mode and probably you will have to play with Weight Factor in order to improve tags' visibility.
5. Choose an Outline Method.
N.B. This is about tag’s reaction when mouse pointer goes over it.
6. Turn Drag Control on to let your site visitors moving cloud by mouse.
7. Tune Min Opacity.
N.B. This is opacity of tags at back of cloud.
8. Tune Pulsate to Opacity.
N.B. Tag pulsation when mouse pointer hovers it. Set to 1 for none.
9. Use Lock Rotation to limit or prevent it in response to the mouse.
10. Enter a Tooltip.
N.B. Use this option especially when the cloud allows Drag Control. Then you can suggest your site visitors to "Drag and Click".
11. Enter a Background Image URL for your cloud.
12. Play with Weight Size Min and Weight Size Max.
N.B. If some tags are too small and others too big you can distribute tag sizes between the limits of these two options.
13. Play with Radius X, Radius Y and Radius Z.
N.B. If a 2D shape spiral or hexagon is selected Radius Z is hidden. For preventing tags from going beyond widget’s frame, fit cloud's content by these options. Change them all and equally. Otherwise Shape may become a disk, a cigar or something else.
14. Tune Split Width.
N.B. For Archives, Authors, Links and mostly Recent Posts you need to reduce Split Width, because they are much longer than usual tags.
15. Choose Font Size.
16. Switch on Border.
17. Set Shadow Offset and Shadow Blur.
N.B. If you don’t want tags casting shadow set Shadow Offset values to 0.
18. Set Tag Color, Background, Border, Shadow and Outline colors.
N.B. All tags will look same.
19. Enter all four Gradient colors.
N.B. They override Tag Color if Weight is on and Weight Mode is color or size&color.
Be aware that the plugin verifies entered hexadecimal color values. A color indicator will show your choice once you leave the field if entered value is correct. If it is not you will be warned.
Here is an example of entering a missing digit value and warning you get.
 The color indicator is superseded by an exclamation "Oops!"
and plugin does not let you continue until wrong value is corrected. For your ease both value formats three-digit and six-digit are acceptable.
The color indicator is superseded by an exclamation "Oops!"
and plugin does not let you continue until wrong value is corrected. For your ease both value formats three-digit and six-digit are acceptable.
Of course there are exceptions to the rule. For using the original link's background and/or border color you type in
Background, respectively in Border field a word tag.
Then color indicator will be replaced by following text:
original color.
20. Choose either a Web Safe Font or a Google Font.
N.B. Don’t forget that some Web Safe Fonts may not be available on user’s computers though they are named “Safe”. In that regard if you want some more fancy font for your cloud choose Google Font. If chosen it overrides Web Safe Font value.
21. Choose Initial Speed. By default it is 0 in all axes hence your cloud is still.
22. Choose Min Speed and Max Speed.
N.B. First one determines the speed of cloud when mouse pointer leaves it. If you put 0 your cloud will stop in a while. Second one limits maximal speed. You will need to reduce it when intend to apply dragging. Don’t get confused by units of the speeds. Just speed up or slow down.
23. Set Click to Front Time.
N.B. This is the time for bringing a clicked tag to cloud’s front. Keep in mind that when it takes that front position cloud rotation stops and begins loading of the new page.
That’s it. In the other 8 sections is used same format of sub sectioning where each subsection contains same options, but in six of them (Authors, Links, Menu, Pages, Page/Post Links and Recent Posts) there is an additional subsection named MIXED IMAGE & TEXT, which presents one of the most exciting plugin features. Except it the differences are small. Here are all of them:
AUTHORS CLOUD
Options Number and Exclude
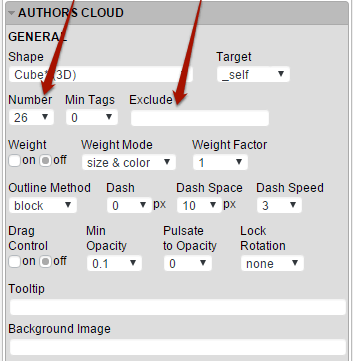
Number of authors sets how many names will rotate in the cloud and Exclude – which authors should not be there. In Exclude field you have to type coma-separated list of authors IDs (not names!).
 Image Scale option, used for tuning size of: avatars
(Authors); link images (Links); icons (Menu) and featured images
(Pages & Rrecent posts). Plugin resizes them to 96x96px for Authors,
Links & Menu or 120x120px for Pages & Recent Posts.
Due to perspective images become smaller at Cloud's back but bigger at its front. So if their real size is 96x96px (respectively 120x120px) their resolution will
worsen at Cloud's front. That's why use images that are at least 10% bigger than the above sizes. Increasing Image Scale over
1 may also worsen resolution if it is not considered with the real size of images.
Image Scale option, used for tuning size of: avatars
(Authors); link images (Links); icons (Menu) and featured images
(Pages & Rrecent posts). Plugin resizes them to 96x96px for Authors,
Links & Menu or 120x120px for Pages & Recent Posts.
Due to perspective images become smaller at Cloud's back but bigger at its front. So if their real size is 96x96px (respectively 120x120px) their resolution will
worsen at Cloud's front. That's why use images that are at least 10% bigger than the above sizes. Increasing Image Scale over
1 may also worsen resolution if it is not considered with the real size of images.
Image Radius option - for setting image corners.
N.B. By setting a proper value (49 or 61) images can become circles.
The main difference here is MIXED IMAGE & TEXT subsection, where you will have to set most probably only one setting - Tag Mode
to most impressive option both.
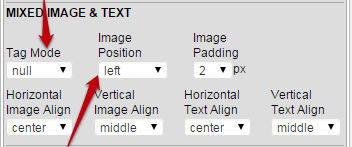
N.B. Image Position is useful for changing image position relative to the text, when Tag Mode is both.
BLOGROLL CLOUD
Options Links Category and Number
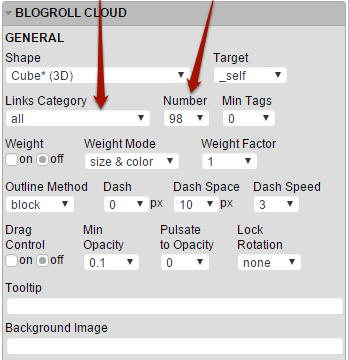
While Number understandably concerns links to be shown, Links Category specifies the category they belong to.
N.B. Blogroll section also gives the opportunity of creating mixed image/text tags via its MIXED IMAGE & TEXT subsection, where images are avatar size (96x96 px), but can be reduced additionally by Image Scale and rounded by Image Radius (SIZE subsection). See explanations in AUTHORS CLOUD section.
CATEGORIES CLOUD
Options Number & Counter

Number concerns number of categories to be displayed and Counter shows the number of posts in a category.
MENU/PORTFOLIO/SLIDER CLOUD
Option Menu
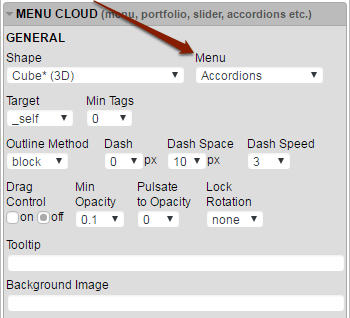
Via this option you choose the menu to be rotated.
There are some more differences here. Namely the options related to tags weighting (Weight,
Weight Mode, Weight Factor, Weight Size Max,
Weight Size Min and the 4 Gradient settings) are missing. This is because menu items are not subject to weighting.
N.B. Menu section also gives the opportunity of creating mixed image/text tags via its MIXED IMAGE & TEXT subsection, where images are avatar size (96x96 px), but can be reduced additionally by Image Scale and rounded by Image Radius (SIZE subsection). See explanations in AUTHORS CLOUD section.
PAGE/POST LINKS CLOUD
Option Custom Container ID
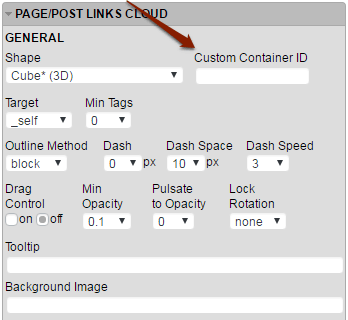
Via this option you specify a particular HTML container (table, div, ul etc.) in the current page/post, where the links for your cloud are.
As above the options related to tags weighting (Weight,
Weight Mode, Weight Factor, Weight Size Max,
Weight Size Min and the 4 Gradient settings) are missing because page/post links are not subject to weighting.
N.B. This section also gives the opportunity of creating mixed image/text tags via its MIXED IMAGE & TEXT subsection, where images are avatar size (96x96 px), but can be reduced additionally by Image Scale and rounded by Image Radius (SIZE subsection). See explanations in AUTHORS CLOUD section.
PAGES CLOUD
The only specific thing here is the Number option determining the number of pages to be displayed.

On the top of that tags related to weighting (Weight, Weight Mode, Weight Factor, Weight Size Max, Weight Size Min and the 4 Gradient settings) are missing like in previous section, by the same reason: Pages are not subject to weighting.
N.B. Pages section also gives the opportunity of creating mixed image/text tags via its MIXED IMAGE & TEXT subsection, where images are avatar size (120x120 px), but can be reduced additionally by Image Scale and rounded by Image Radius (SIZE subsection). See explanations in AUTHORS CLOUD section.
POST TAGS CLOUD
Options Number & Counter
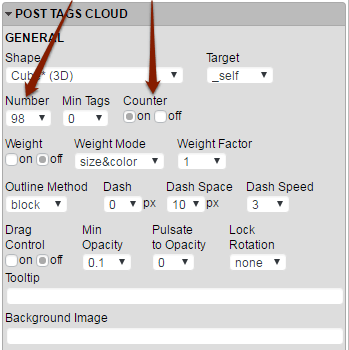
Number concerns number of post tags to be displayed and Counter shows the number of posts where a post tag is used.
RECENT POSTS CLOUD
Options Post Category, Number & Target
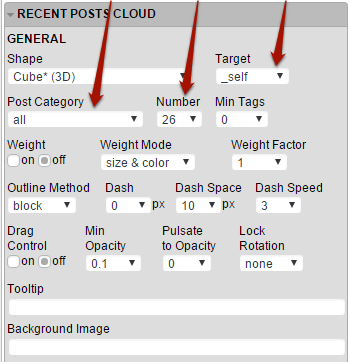
Post Category – the category they belong to;
Number – the posts to be rotated.
Target – where to open your tag links.
N.B. Recent Posts section also gives the opportunity of creating mixed image/text tags via its MIXED IMAGE & TEXT subsection, where images are avatar size (120x120 px), but can be reduced additionally by Image Scale and rounded by Image Radius (SIZE subsection). See explanations in AUTHORS CLOUD section.
In the end save your work. A message with a generated Shortcode will pop up. If you want to put your cloud apart from sidebars (in a page or in a post) save the instance in Inactive Widgets. After this first saving the Shortcode will be available at the top of the widget in WIDGET OPTIONS section of the instance.
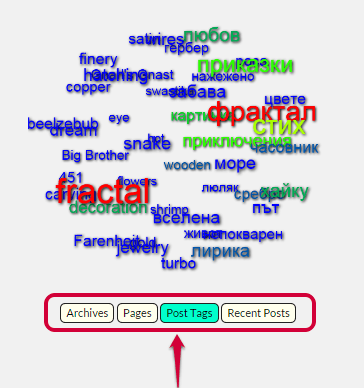
That’s all folks. Before you go and use the plugin see below two examples of clouds made with it.